Sunday, December 29, 2013

A Love Story

It probably was Gertie's post on her sewing machine that got me into wanting a Bernina 1008.


The machine I have now, it is not up to my requirements, to say the least. It is not to be trusted. I have some compromised projects put aside waiting for a better tool to sew them. Gerthie's defence of her machine, after some time of using it, is consistent with all the opinions, virtual and in the flesh, I have managed to listen to in the last weeks. So, this is the machine I would like to sew with. 
I am in a mission now!
UPDATE: yesterday I was in a shop to have a real look at it ant try it. The machine is ugly, that was the first impression, it looks like 50 years ago. Compared to the digital ones, this mechanical one, is sturdier, and more powerful. It has a 105 CV motor, and sews super thick fabrics like nothing. It's quite heavy, since it's all metallic (digital ones are plastic), but easy to move and store away if the space requires dismantling after sewing. The number of different stitches is limited, but probably enough. I missed the triple zig zag my machine does, and an elastic straight stitch for jersey with open seams. The light is yellow, as opposed to white led in the digital ones. It is superfast, and I tried a buttonhole too, which was quite nice, although you have only one possible model. 
So now I am in reflection mode, before I decide to spend my money.
Anyone has an opinion?

Tuesday, December 24, 2013

Blue Velvet Dress


This is another fabric I bought in Denmark this summer in Stoff 2000. It's a pitty they don't have an English version of their website to buy some more, because the fabrics they had in the store were original and very nice. In this case, we are talking about some striped jersey velvet, perfect fot a confortable and informal winter dress. 
I used my "Universal Dress" pattern, which I made from the "universal T-shirt" pattern, from Patrones magazine. I baptized it like that becasue of the number of times I have used this pattern. I love the raglan sleeves, which are a perfect option for jersey or knit projects like this one. 


I decided to add a hood, which pattern I drew using Aldrich's book. I used some blue jersey to make the inside of the hood and the facing of the neck opening.
Important to mention is the effort one has to make to marry the stripes in the lateral seams and in the sleeve seams.


After the first fitting, I only had to modify the waist of the dress, entering it 1 cm, and then opening the side seams another cm, making thus a more gracious skirt.


I am really happy with the outcome. It is a perfect marriage of fabric and pattern. The only drawback, is that you end up with a very dirty sewing room after sewing with this velvet fabric, whick produces inmense quantities of fluff. Once the dress is finished, its seams binded with a good zig-zag, and washed, the fluff is gone. But I had my vacuum cleaner next to me for the whole project!


Saturday, November 16, 2013

White Leather Bag

Past summer I enrolled Don Morin's course in Craftsy: Making Leather Bags. I am thrilled about everything I learnt! Did you know that only with some supplies we can sew leather at home, with our domestic machine? Let me explain you about it...
 I didn't like the pattern Don was offering, so I made my own pattern and tried to apply everything I had learnt during the course. My experience with Craftsy online courses is that it is better to watch them while sewing something easy, and start the project once I have watched the whole course.
I found some cheap goat leather in the internet. We can find leather bargains in the internet, specially small pieces.
To start, I bought all the tools I was going to need to complete my project. A self-healing mat, a rotary cutter, a Teflon foot, hand and machine sewing needles special for leather, double sided mounting tape, and since I couldn't find the cold rubber tape Don was using, I substituted it for some surgical tape (made of clothing, it performs the function of preventing leather form stretching when sewn):

As Don recommended, I started by doing a mock up bag in felt. It proved to be helpful, because I changed the measures, and then used it as pattern to cut the lining and leather.


Secondly I proceeded to cut the lining and its interfacing:


Then I made a zipper pocket with its bag, and on the opposite side, I sew a rectangle and divided it into two pockets for phone, etc.


I reserved the lining for later. I cut the leather on the self-healing mat with the rotary cutter. I practiced with some scraps first, and I missed some metal ruler, but I got quite nice cut pieces at the end.
The first thing I sewed was the handles. I put some felt inside for them to be thicker. It took some essay and error to adjust my machine to make good stitches with the thick nylon thread I used, but I managed to do an acceptable job after all:


 Then I put the surgical tape all around the pieces of the bag, and applied the double-sided mounting tape on top of it before sewing two pieces together. Since we cannot use pins or basting with leather, we put the two pieces to be sewn together with this tape. Avoid putting it in the needle's path, we don't want the glue stuck in in the needle.


I sewed the two lateral pieces, stoping in every corner, then taking the thread to one side and knotting them up, since we cannot go backwards with the machine when sewing leather.
I measured the complete lenght of the bag opening and then finished the lining (with mitered corners) and its leather belt on top, which had to be the same lenght as the bag opening. I attached some magnetic fastener in the middle of this leather piece. I sewed one side at a time, previously applying double sided tape, and knotting the treads together after sewing each of the four sides:


And this is the final result. It is a lovely white leather bag, just as I had imagined it, but winter has come, and this project, planned in summer, will have to wait in my wardrbe for the sunny months ahead: 


Tuesday, October 22, 2013

Pink-Trimmed Black Dress


Eva Hache was the inspiration for this project. I had some elastic cotton in my stash waiting to become a classic dress. On the other hand, I had my faboulous Swedish Hasbeens, which are so confortable and so beautifully pink, so it was a total call for me. I found the pink trim and some pink buttons in a sewing supplies store in Lleida, and started to make the dress.
I decided to use the top of my 1958 Simplicity Pattern. This is the third time I use this pattern, it is beautiful and confortable, and fits me like a glove. For the skirt, I had a half cricle skirt planned, but I had not enough fabric for it, so I decided to use my own pattern for the long skirt I made last winter, which was absolutely perfect. I tend to appreciate more and more my own patterns instead of the comercial ones. They are better in all senses. Even in the case of this top, I thought next time I am going to make my own pattern from the "close fitting bodice block" in Aldrich's book. 
A good trick with these two-pieced dresses is to finish the skirt with a waistband, well adjusted and confortable to wear and sit in. Then, we will attach the bodice to that waistband, machine sewing it by the inside. Only then the dress is confortable and stays always in its place, on the waist.
To apply the trim was, not difficult, but laborius to say the least. I learnt in the process that it is better to bast it in place in the good side to the dress first. Second, we will put the facing on top of it, secure it with some pins, and then sew it with the machine on the side of the dress where we can see the basting, and goint just over it. Even thus, one can see the white cotton peeking at some places. But the overall effect is wonderful.
Judge by yourselves:

I even  made the pink trimmed belt, using and old buckle my auntie gave me.


I am in Sitges, in the Fantastic Cinema Festival, my favourite event of the year.


Wednesday, October 16, 2013

Long T-Shirt, Short Dress

I made this simple, but very confortable and practical long top form some jersey fabric I found in a retail store we have in our city, where they sell fabric by weight. This is my favourite shop, mostly because it is cheap, you can touch and feel every fabric, and you get inspired by them. Most of the times, I buy some piece just because is nice, and then I start thinking what could I do with it, like in this example. Although sometimes I like to sew with luxury fabrics, most of the times the principle guiding me is economy. I learn to sew from my mother, and her aim was to save money sewing all the clothes of the family. Nowadays, with very cheap clothes made in countries where the workers are underpaid, we tend to dew for other reasons, but since I grew with it in mind, I still feel well when I manage to get a dress done for 5 Euros. I used the Universal T-Shirt pattern I have used so many times before, which I love for its raglan sleeves, specially suitable for knit or jersey fabrics. It makes a very nice outfit with some leggings for this time of the year.

Thursday, October 3, 2013

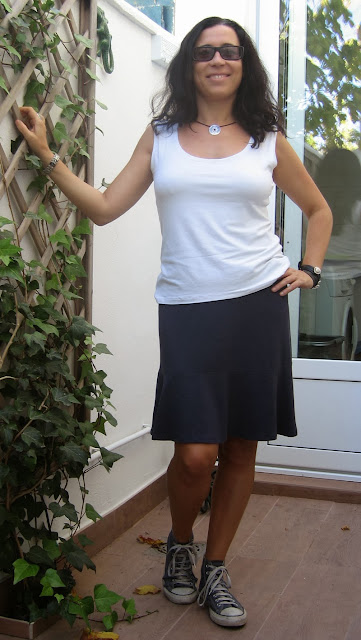
Summer Knit Skirt

This is a very simple, but very becoming and comfortable jersey skirt.


I made the pattern myself from Aldrich's book, parting from the very simple skirt pattern, in the "Flat Cutting" section of the book. This pattern is for knit fabrics, so it was perfect for this project.
The first modfication I made was to add some flare to the pattern, cutting vertically form the waist dart downwards and moving the dart together.
Then, I cut it in two horizontal parts. I divided the lower part vertically in four rectangles, cuting them all along but leaving the upper tip joined. We will open the lower part of the rectangles giving them a fan shape. I finished the skirt with an ellastic band in the waist. After some small correction in the first fitting (it was 2 cm too big), I finished it in a perfect fit.
I think it is confortable, sporty, but ellegant at the same time.
Here I am wearing it with my Converse, but wear it with some nice sandals and we'll have a nice formal skirt. I love it!

Friday, August 30, 2013

Lolailo Sundress

With the summer at an end, one must take profit of time and sew sundresses! I had this stretch fabric since last summer, so I've spent some time thinking what to do about it. Finally I remembered this pattern (Burda magazine) from some summers ago, which was complete success in two previous projects, and I think it has been a winner.
Another good decision was to line the bodice with red jersey. I had a small piece hanging around and also, there was not enough fabric to do the lining. You can see the red underlining in the back of the dress, in the knot.
All in all, an easy, fast project, very refreshing and with a practical result.I love wearing sundresses in summer because you are dressed in a moment. These days I am following a Craftsy course, and I needed some easy labour to keep my hands busy while I watch the videos.


Mind my new shoes!
They are Swedish Hasbeens Savanah and I am completely in love with them!

Sunday, August 25, 2013

Blue Sundress


Hello!

We were in Denmark on holiday last July, and there I discovered people is sewing and Knitting a lot, it is very popular as one can see for the lots of shops selling knitting kits or fabric. I found this in Copenhagen, http://stof2000.dk/, and of course, I bought myself a couple of potential dresses. This one is a high quality cotton, crisp and with a beautiful liberty pattern.


The last two summers I have been seeing lots of lady dresses like this


 and I thought this cotton would be lovely for one. I used again the Burda skirt pattern, and made a new pattern for the top. I followed Aldrich's instructions from the "Close Fitting Bodice Block". First, I shaped the side seam and armsythes. Second, I shaped the waist, and decided to combine the waist and bust darts, obtaining a big waist dart (there are multiple choices to place the bust dart, it is wonderful). Finally, I draw a neck line, deciding to make it as deep (it is hot!) both in front and in the back, in a round shape. I placed a zip in the back, so that there is nothing at the sides to compromise its close fit to my body.


I finished the skirt fisrt, and sew it to an underlined waist band. Then I completed the bodice and attached to the waist bans so that this was ocult. In this way, the dress sits perfect and confortable around my waist.


The result is wonderful, very flatterng to my old sillouette, confortable, ellegant and lively. I only had to modify the bodice length, making it 2 cm longer. It is amazing, i won't tire of exclaiming, how the custom made patterns sit wonderfully in my body!

Wednesday, August 7, 2013

Black Minishorts

Basic piece one has to have in her summer wardrobre, for sure, the black minishorts. Wear them with flat sandals, and you have a casual, comfortable outfit, wear them with high heels and a blouse and you will have some sexy yet elegant ensemble.
The pattern is selfmade, from Aldrich's book (Hipster Jeans), and the fabric is some wonderful black cotton I bought in Leeds last year. It has some ellastan into it, and it is thick and a touch shiny, just perfect. I still have some left to make a black dress. All in all, I am quite happy with the result.


Saturday, May 18, 2013

Little Black Not-Leather Dress

Something good and something bad have come out of this project. Bad first? Well, although a good imitation this fabric is nothing more than plastic, so you can imagine how I was sweating inside it in a rock concert I wore it to. To be positive, one can say it was like a sauna session. The fact that it is sleeveless, means that is has to be warm to wear it, but then this non-transpiration problem makes this a waste of time and money (not much of the last, it was a cheap bargain)
Now the good news: the idea and the design are, if we do not count the fabric choice) perfect. So, the positive outcome is double: first, it becomes a new project (I must find some real leather and make it again, but transpirable); second, I learnt something really important: never use non-transpirable, faux leather fabric ever again.
In the making of the dress, I kind of learnt some tricks to sew the faux leather in the machine. If the fabric is sticky and makes it difficult for the machine teeth to move it, cover the seam to sew with some pattern paper strips and remove them after having sewn it. It works perfect.


Here I am wearing it with my wonderful new Dr. Martens kick ass boots, beautiful with long socks.

Saturday, April 27, 2013

Vogue Wrap Dress

This is my second and improved attempt to the wrap dress. When I made the first version of this pattern, I still did not know Americans included seam allowances in their patterns, so I made it 1.5 cm wider all around. After reading some books, watching some videos and following some blogs, I figured out how other civilizations sew. Having seam allowances included, they tend to pin and sew the pieces together in the machine. I learned to sew from my mom, and all the women sewers around me follow the same method. We cut the pattern without seam allowances, pin it to the fabric, and cut this with wide seam allowances, specailly in the doubious places. Then we mark it with tailor tucks, take the tissue away, cut the tucks and baste the pieces together by hand for the first try. Only when it is perfect and ready, having made all the necessary adjustments, we sew it by the machine. After that, we take the basting thread out and proceed to finish the garment. Having followed this method all my sewing life -more than 20 years- I am not for change now. Besides, I believe this method makes more sense than simply pin the pieces together and machine sew it by imaginary lines.
Anyways, here is the seocnd version of the wrap dress, now in my perfect size. It feels wonderful, I think, because the fabric, a soft brown knit has a wonderful hang to the body and great movement when I walk.
Hope you like it. I have yet another version of this dress in mind for next winter.


Sunday, April 21, 2013

Blue Assimetrical Jersey

This is yet another example of the possibilities of my T-Shirt Universal pattern. This time, I decides to cut a shoulder lower than the other and give some movement to this piece, which otherwise would be too classic. The result is really nice and wearable now in the spring, with a blue tank top under it and a pair of blue jeans. It received a lot of compliments when I wore to school, specially for the colours and texture of the knit, which I found in an opshop. How do you like it?

Monday, March 25, 2013

Who Wears the Pants?

Well, the answer is obvious, isn't it?
I was so enthusiastic about Aldrich's book for women that I decided to buy the masculine version:


What I had in mind was to make a new and better version of the corduroy trousers I had made for my boyfriend, which after being redimensioned form a magazine pattern, did not look as good as they should. With my own patterns, the result was as good as this:


I took measures, I draw the basic block, and made a  muslim from there. I had to make some minor adjustments to the muslim, and now I have the perfect pattern for corduroy pants, if my sweetheart does not gain any volume!
Some parts, like the zipper, o the belt loops are delicate and you need some practice to do them well. In fact these are my first perfect belt loops so far!


Well, my boyfriend is so happy with the result that he has decided to reserve them for dressing up occasions, when they were meant for work. He finds the corduroy mustard yellow perfect, so I am very happy with the job done.

Since I started constructing my own patterns, I am moving away from magazines' The fit is so perfect I can only recommend every seamstress to go for it.

We are now in December 2013. I've made a second version of this pattern, since I kept my toile fo further occasions. It is a cinamon corduroy this time, and the result, as good as the firts one, of course:


Saturday, March 16, 2013

Animal Jumper

Last winter I made this dress in this spotted grey wool and I got some fabric left. I decided to use my unviersal T-shirt pattern again, because I know it is just perfect.
I had the nasty surprise of itchiness as soon as I tried it on the first time, so I decided to underline it all with a very thin beige fabric with a lot of give. I sew it around the neck, right to right, and turn it to the inside, sewing then the bottom of the sleeves and body. 
Now, it is confortable and nice to wear, so I consider it a good solution. It wears well with jeans.

Here I am wearing it with minishorts and my grey UGGS, which have proved really wearable (and of course comfortable!) in the cold Lleidatan winters.

Thursday, March 7, 2013

Wrap T-shirt

I have always liked wrap dresses and t-shirts, and this is one of many many tries I've made, and a very good one, likely to be recreated, I think. It is a Burda pattern, and it became perfect for my mauve elastic cotton fabric:

Sunday, February 10, 2013

Black Lace Back Dress

Here is the product of three correlative mistakes in the process of sewing myself a little.. well, first, I bought the lace to make a panelled skirt. I draw the pattern just to find out the fabric was so scarce for that design! (1st mistake). Then I decided to make a dress inspired in:


but (and 2nd mistake, due to poor light) I cut the dress in this black cotton/lycra just across the grain. Now my options, with the sleeves cut, and half the cotton/lycra gone, where fewer and fewer, so I had to be brave and take this as an oportunity to dare (no much choice neither). Finally I used the left lace to make the back of the dress. I could look better, but the dress is quite nice. What do you think?


Here wearing it with my Timberland lace-ups, my favourite boots of all times. Too bright tights, at least in the picture, I hope they were not that glittering in real :-(!

Saturday, February 2, 2013

Sewing for Others

This time it was not for me, but for my mother in law. I must say, once I have started drawing my own patterns, it will be difficult to go back to using magazines' patterns.
I took measurements, draw the simple jersey block and ... wow, it was perfect at the first fit. Considreing she is a 68 year old lady, with not a perfect figure (who is???), it was wonderful not to have to modify anything. And now I have a perfect block for her.