Sunday, October 18, 2015
Black Jersey Top / Samarreta negra de punt
This is a fast project for a trip. Started and finished during the same afternoon. I was going to a rock festival and needed a black long tight top. Why I did not have one, I cannot understand. Since I made it, I wear it all the time. It is a must in any wardrobe, specially in this time of the year when we transition from warm to cold.
I used my universal t-shirt pattern again (for the zillionth time), took 1 cm off at the sides to make it tighter and 3 at the sleeves. I used an overlock stitch to sew the side and sleeves seams. My machine is broken and I am about to buy a new Bernina (Oh! how cool is that???!!!) and in the meanwhile my auntie lent me her old Pfaff, that sews like and angel. I cut the neck in a boat fashion and rolled it once towards the inside. Finally, I finished all the hems with the twin needle, with perfect results.
My old compact camera also broke (I am in a demolition phase it seems), and I am using an even worse one form my school. Pictures are terrible, I know, but they will have to do for now. This was taken at Sitges.
Aquest és un projecte ràpid dels que fas en una tarda. Al dia següent viatjàvem a un festival a Bèlgica i necessitava una samarreta negra llarga per quan no fa ni fred ni calor (tot i que a Bèlgica fot un fred que pela, als interiors no, és clar).
Vaig tornar a utilitzar el meu patró de samarreta universal, per enèsima vegada. Té mànigues raglan, i funciona de perles per teixits de punt.
Com ja vaig explicar, la meva vella Alfa està trencada, i mentrestant m'estudio quina Bernina em compro (oh! què bé sona això!!!), la meva tieta m'ha deixat la seva Pfaff, que cus de meravella. Vaig utilitzar una simulació de punt overlock, tallant després la roba molt a ran perquè quedi molt poqueta, mig cm. Vaig tallar el coll per fer-lo amb forma de vaixell i vag rematar totes les costures doblegant-les cap a dins amb agulles i cosint-les amb l'agulla doble. El resultat és perfecte. No sé com podia viure sense ella, la veritat.
La meva vella càmera també s'ha trencat (a mi els aparells se'm trenquen de tres en tres!), i mentrestant me'n compro una (va per llarg), vaig fent amb la de l'escola. Perdoneu la pèssima qualitat de les fotos.
Thursday, October 1, 2015
Gingham Dress / El vestit de quadrets vichy
Gingham is a medium-weight balanced plain-woven fabric made from dyed cotton or cotton-blend yarn.[1] It is made of carded, medium or fine yarns, where the colouring is on the warp yarns and always along the grain (weft). Gingham has no right or wrong side with respect to colour.
The pattern includes pockets, wich are a very practical and nice touch.
I made self enclosed seams all over the dress, and for the neck line and amrsythes I used facings that I zigzagged and secured to the dress with a blind-stitch.
I made the buttonholes with the machine, and it broke there. The cost of the reparing has helped me decide I need a new machine!
The result is very nice and confortable, it is a wonderful fabric.
El patró inclou butxaques, que resulten pràctiques i molt boniques.
Vaig decidir entornar totes les costures i polir-les amb repunts. A l'escolt i les sises vaig utilitzar vistes, que vaig sobrefilar a màquina, i les vaig cosir al vestit amb un punt invisible.
Vaig fer els traus a màquina. Fent els traus precisament, se'm va trencar la meva vella Alfa, i em sembla que he decidit comprar-me'n una de nova!
El resultat és força bo, el porto molt de gust.
Wikipedia
The inspiration was Emy Rossum /La inspiració fou l'Emmy Rossum
I was looking for a good black and white gingham and I found this at Stone Fabrics. It was not cheap, but it was 100% cotton, I cannot stand plastic fibers.
For the pattern, I used Burda Magazine. It had a similar design, and I only had to make three small alterations:
- I added some space around my bust, just where the lateral front pannel and the central piece meet.
- I closed the neckline 4 cm all around, since the design was really low cut.
- I added a neck similar to Emmy's dress, which I designed with the help of Alcrich's book, and it became perfect.
- The fourth alteration was a failure, but it is worht it recording it for future projects. I added some fabric at the waist, thinking I would need it, but then the dres is too roomy in that area. Nothing a belt can't solve, but not necessary in future projects.
The result is very nice and confortable, it is a wonderful fabric.
El cotó de quadrets vichy es una roba típicament de cotó, tot i que ara a
les botigues de roba en trobem de polièster o barrejat.
Vaig
comprar aquesta roba a Anglaterra per internet, perquè per aquí, com
sovint em passa, no era de cotó 100%. Tinc la sensació que a Catalunya
no donem importància a la composició dels teixits, un fet cabdal per mi.
Vaig utilitzar el patró d'un vestit de la revista Burda, al qual vaig fer algunes modificacions:
- Vaig afegir roba al voltant del pit, un parell de cm a cada costat, entre el costadet i la peça central. La modificació va resultar perfecta.
- Vaig fer l'escot molt menys pronunciat, ja que a la revista era un vestit molt escotat. Hi vaig afegir 4 cm tot al voltant.
- Vaig dissenyar i afegir un coll similar al que porta l'Emmy. El patró el vaig dibuixar jo mateixa seguint les instruccions al llibre de Aldrich.
- La quarta modificació va ser una errada. Vagi eixamplar la cintura del cosses i la faldilla uns 8 cm en total (4 a cada costat), i va resulta massa ample. Com que va amb cinturó no hi ha cap problema, però la propera vegada he de deixar el patró tal i com està en aquesta zona.
Vaig decidir entornar totes les costures i polir-les amb repunts. A l'escolt i les sises vaig utilitzar vistes, que vaig sobrefilar a màquina, i les vaig cosir al vestit amb un punt invisible.
Vaig fer els traus a màquina. Fent els traus precisament, se'm va trencar la meva vella Alfa, i em sembla que he decidit comprar-me'n una de nova!
El resultat és força bo, el porto molt de gust.
Sunday, September 6, 2015
Girlie T-Shirt Modification
Ha ha! It sounds like a The Big Bang Theory title, but this post is about a very practical and recurrent process to transform one regular t-shirt into a piece of clothing that actually fits us girls better. I love collecting my favourite bands' merch, but too often they do not have the girlie version, so I have to customize it.
I think that the pictures speak for themselves. We must use a jersey neddle in the machine and sew the seam with a very narrow zigzag for elasticity. Next to this stiching, we will make a wide and short zig zag, and we will cut the seam allowance reeeeally close to it. In that way we will have something similar to the job done by sergers, only we have to make it in three steps instead of one.
For the sleeves and bottom hem, we will roll the fabric towands the inside twice (1.5 cm each turn), and we'll machine-stitch it with a jersey double needle.
Finally, we'll remove the original t-shirt's neck and sew it again in place but in a deeper cut line. We will place the neck elastic band in the inside, under the folded neckline. We will machine stitch it with the double needle too.
And do not forget the ironing in every step.
This procedure is the same I use to adjust my boy's t-shirts when they are too big, minus the neck adjustment.
I think that the pictures speak for themselves. We must use a jersey neddle in the machine and sew the seam with a very narrow zigzag for elasticity. Next to this stiching, we will make a wide and short zig zag, and we will cut the seam allowance reeeeally close to it. In that way we will have something similar to the job done by sergers, only we have to make it in three steps instead of one.
For the sleeves and bottom hem, we will roll the fabric towands the inside twice (1.5 cm each turn), and we'll machine-stitch it with a jersey double needle.
Finally, we'll remove the original t-shirt's neck and sew it again in place but in a deeper cut line. We will place the neck elastic band in the inside, under the folded neckline. We will machine stitch it with the double needle too.
And do not forget the ironing in every step.
This procedure is the same I use to adjust my boy's t-shirts when they are too big, minus the neck adjustment.
Etiquetas:
girlie t-shirt adjustment,
t-shirt adjustment
Black and White Outfit
My last two projects go so well together that I decided to make an official outfit out of it, but in fact they are different in every sense.
The fabric for these capri pants has been in my little stash for a couple of years waiting for its turn. It is a cotton sateen with some elasticity that I bought in one of our trips to Leeds, in the city market. Suddenly I realized I did not have any capri pants and I think they are wonderful for summer, spring and early fall. I love how capri pants make our shoes more visible and sexy.
I used my own pattern for these, pants' fitting being too delicate to be toying around with new experiments. Since this was elastic fabric and I wanted a tight result, I took a couple of cm off in both sides of the pattern, from the crotch downwards. It resulted too much at the first fitting and I had to adjust and try, adjust and try for A LOT of times before I got the perfect fit. I also took 2cm (x4) off the waist of the pants to make them really tight.
After so much trial and error, I could not even record the new pattern, because every fabric has its own give into it, and I will have to adjust the basic pattern in future projects as I did with this.
I discovered the double needle for the self bound seams I always make in pants, and I made a very good job with the zipper construction following Armstrong's instructions.
The result is almost perfect,maybe a little too tight in the waist department. I cannot gain another gram if I want to wear them comfortably, hehe...
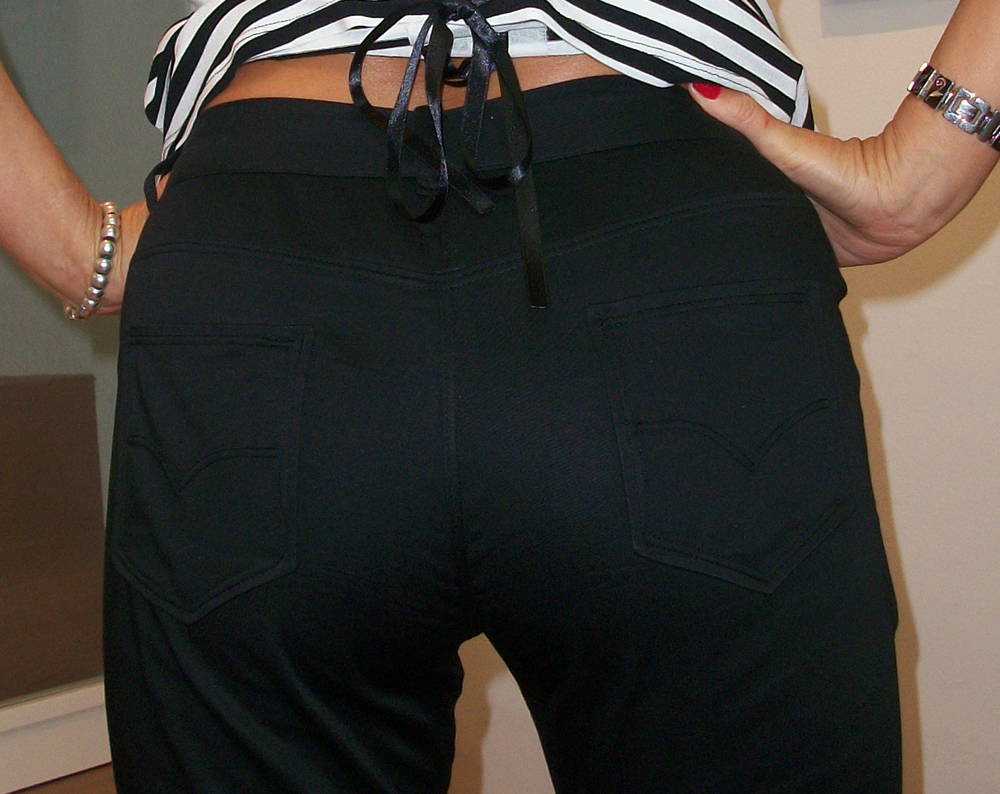
As for the top, I used some remaining viscose from a previous project, but the fabric was scarce, so I had to include a seam in the centre back. After sewing it at the machine, I realized (my boyfriend did, in fact) that the stripes were not well-matched and it was almost impossible to undo the stitching, so I decided to take it to the haberdashery to have some metal eyes installed, and pass a black ribbon to try to hide my mistake. It is also a nice detail enhancing the top, I am really happy with it.
Again, I used the double needle for the seams around the neck and armholes, which are rolled in themselves 1 cm. This ending in fabulous because it looks nice, it is quick, and it has elasticity like the fabric.
The fabric for these capri pants has been in my little stash for a couple of years waiting for its turn. It is a cotton sateen with some elasticity that I bought in one of our trips to Leeds, in the city market. Suddenly I realized I did not have any capri pants and I think they are wonderful for summer, spring and early fall. I love how capri pants make our shoes more visible and sexy.
I used my own pattern for these, pants' fitting being too delicate to be toying around with new experiments. Since this was elastic fabric and I wanted a tight result, I took a couple of cm off in both sides of the pattern, from the crotch downwards. It resulted too much at the first fitting and I had to adjust and try, adjust and try for A LOT of times before I got the perfect fit. I also took 2cm (x4) off the waist of the pants to make them really tight.
After so much trial and error, I could not even record the new pattern, because every fabric has its own give into it, and I will have to adjust the basic pattern in future projects as I did with this.
I discovered the double needle for the self bound seams I always make in pants, and I made a very good job with the zipper construction following Armstrong's instructions.
The result is almost perfect,maybe a little too tight in the waist department. I cannot gain another gram if I want to wear them comfortably, hehe...
As for the top, I used some remaining viscose from a previous project, but the fabric was scarce, so I had to include a seam in the centre back. After sewing it at the machine, I realized (my boyfriend did, in fact) that the stripes were not well-matched and it was almost impossible to undo the stitching, so I decided to take it to the haberdashery to have some metal eyes installed, and pass a black ribbon to try to hide my mistake. It is also a nice detail enhancing the top, I am really happy with it.
Again, I used the double needle for the seams around the neck and armholes, which are rolled in themselves 1 cm. This ending in fabulous because it looks nice, it is quick, and it has elasticity like the fabric.
Etiquetas:
capri pants,
elastic jeans,
jersey top,
striped top
Thursday, August 13, 2015
Menorca Dress
We sewers-bloggers always explain three processes when we report a new project:
It was only 1.2 x 1.15 m, and it had an alongside embroidered border that I wanted to save for the dress hem.
The fabric brought the inspiration, I was not in Ibiza, but very close to it, and I had a small piece of white cotton, so I started to think about the dress I would make.
Back home I had this old summer dress, so old I only wear it around the house, comfy and becoming, so I decided to rub it off.
After rubbing off the bodice and having a fitting session with it, and saw it was small at my boobs (which I had compensated, 20 years before, by elongating the back???!!!) Curiously there was too much fabric in my upper chest, so I remembered Karen's words and decided to make a FBA, which worked wonders:
For the skirt of the dress, I folded the dress by the back zipper (its only seam all around), and after securing it with pins, I placed over the bias-folded fabric, and cut.
I saw the dress was resulting too sheer, so I ripped and old white cotton dress, and used the fabric for an underskirt, The bodice I made it double, using the inside one as facing.
For the bottom hem, I cut the embroidered detail to the thread's rim, ans stitched to the skirt bottom with an embroidered stitch my machine has:
The result is wonderful, I am really happy with it. Comfortable, cool and becoming to my summer tan.
- How did we get the fabric
- How did we make the pattern
- How did we get the inspiration (which often comes along process 1 or/and 2)
It was only 1.2 x 1.15 m, and it had an alongside embroidered border that I wanted to save for the dress hem.
The fabric brought the inspiration, I was not in Ibiza, but very close to it, and I had a small piece of white cotton, so I started to think about the dress I would make.
Back home I had this old summer dress, so old I only wear it around the house, comfy and becoming, so I decided to rub it off.
After rubbing off the bodice and having a fitting session with it, and saw it was small at my boobs (which I had compensated, 20 years before, by elongating the back???!!!) Curiously there was too much fabric in my upper chest, so I remembered Karen's words and decided to make a FBA, which worked wonders:
For the skirt of the dress, I folded the dress by the back zipper (its only seam all around), and after securing it with pins, I placed over the bias-folded fabric, and cut.
I saw the dress was resulting too sheer, so I ripped and old white cotton dress, and used the fabric for an underskirt, The bodice I made it double, using the inside one as facing.
For the bottom hem, I cut the embroidered detail to the thread's rim, ans stitched to the skirt bottom with an embroidered stitch my machine has:
The result is wonderful, I am really happy with it. Comfortable, cool and becoming to my summer tan.
Etiquetas:
embroidered cotton,
Ibiza dress,
summer dress,
whtie cotton dress
Tuesday, August 4, 2015
Jersey Sundresses: Not One But Two
Together with the fabric for my Coco dress, I bought two more jerseys in Praha last year. After seeing that 1mx1.5m is not enough for sleeves or anything fancy, I decided to use them to make two sleeveless dresses for my summer travels. I just finished them on time to put them in my Menorca suitcase, but my camera broke in the plane just before landing, and I could not take one single picture with the dresses on in jaw-dropping beaches (<3 Menorca!)
The pattern for the dresses is a variation off my CocoDress pattern, following the instructions in Aldrich's book for the Stretch Dress on pages 166, 167. I did not make the front panels though, neither the waist shaping.
With this project and the previous one, I used the lazy ass method: I cut the fabric two cm from the paper pattern, and sewed it 2cm from the edge. I had modified the skirt to perfection with the Coco, so here it was perfect at first trial.
To sew the seams with a jersey fabric like this, I use a zigzag stitch with very very small width, it seems a straight line to the eye, but it has got elasticity. Next to this stitching line, I zigzag again with wide stitches, and cut the seam allowance just after the zigzag to imitate the overlock. Finally I press the small seam allowance to the side.
For the bottom hem, armsythes, and neck line, I simply rolled the seam allowances inwards twice (1cm each roll), pinned it and machine stitched them with the double needle. The result is perfect.
The pattern for the dresses is a variation off my CocoDress pattern, following the instructions in Aldrich's book for the Stretch Dress on pages 166, 167. I did not make the front panels though, neither the waist shaping.
To sew the seams with a jersey fabric like this, I use a zigzag stitch with very very small width, it seems a straight line to the eye, but it has got elasticity. Next to this stitching line, I zigzag again with wide stitches, and cut the seam allowance just after the zigzag to imitate the overlock. Finally I press the small seam allowance to the side.
For the bottom hem, armsythes, and neck line, I simply rolled the seam allowances inwards twice (1cm each roll), pinned it and machine stitched them with the double needle. The result is perfect.
Monday, August 3, 2015
Coco Dress Knockoff
Tilly is an inspiration to us sewers, and her patterns are a success around the world. Specially the Coco Dress, a design for jersey fabric, an easy project for beginners that results in a very versatile, comfortable and becoming dress.
Inspired by it, I decided to make my own pattern using Aldrich's book and its Close Fitting Bodice Block for Less Flexible Jersey fabrics, pages 164, 165. I already used this pattern in two previous projects: Liberty Wool Dress and the Black Lace Back Dress. Making your own paper patterns might seem arduous work, but it saves you money and time, specially when you use the same block again and again.
I bought the jersey stripped fabric in a Praha shop last summer, but I only bought 1 metre x 1,5 m wide and I could not make the sleeves out of it. I was lucky to have a purple jersey in my stash, and the contrasting sleeves make the dress more lively and fun (Phew!!)
I observed Tilly's Coco closely and tried to imitate the evasé line of the skirt. Parting from the waist of the pattern, I drew an opening line (10 cm at the bottom) and a curved hem line. I also added a boat neck line, which I redid after fitting the actual dress.
And that's it. Easy peasey! I own no serger, So I zigzaged all the seam allowances and cut them at 0.5 cm, to try to imitate the serger (this is an imitation game, hahaha!)
The dress bottom and sleeve hems were rolled and machine-stitched with a double needle. And the neck as well. I used different width double needles. 0.6 cm for bottom hem and sleeves, 0.4 cm for the neck.
The result is brilliant. I planned to include pockets in contrasting fabric (=sleeves) to complete the dress and although my stylist said no, I still have doubts. What do you think?
Etiquetas:
Coco,
Coco dress,
jersey dress,
jersey pattern,
tilly's coco
Subscribe to:
Posts (Atom)